Proxy servers can be useful for many online tasks, from managing traffic and protecting your privacy to accessing location-based content. But having a basic understanding of what a proxy server does is only the beginning. The real challenge is getting it set up correctly and ensuring it works with your device, browser, or application.
Not sure where to start? This guide walks you through everything you need before configuring a proxy server and shows you how to set it up step by step across different platforms. By the end, you'll know how to configure your proxy settings and check that your connection is working properly.
Before configuring a proxy server, there are two things you need to have ready: choosing the right proxy type and collecting the correct connection details. The proxy type determines how your proxy handles different tasks, while the connection details enable your device or application to connect to the proxy successfully.
There is no one-size-fits-all proxy solution. Different types of proxies offer different levels of stability, speed, anonymity, and IP diversity, so choosing the right option depends on how you plan to use the proxy.
The 3 most common proxy types are Datacenter Proxies, ISP Proxies, and Residential Proxies:
Datacenter Proxies are known for speed and affordability.
ISP Proxies combine the stability of data center infrastructure with ISP-assigned IPs.
Residential Proxies use real residential IP addresses for a more natural browsing footprint.
At IPcook, you can access all 3 proxy solutions with flexible options designed for different needs. Whether you need cost-effective Datacenter Proxies, stable ISP Proxies, or highly reliable Residential Proxies, IPcook provides competitive pricing and scalable proxy resources to help you get started.
Once you have selected a proxy type, the next step is preparing the connection information required for configuration. Most devices, browsers, and applications need several key details before they can connect to a proxy server.
Typically, you will need:
Proxy Address/IP: The IP address or hostname of your proxy server.
Port: The network port used to connect to the proxy.
Authentication Details: The method used to verify your access, such as a username and password or IP whitelisting.
The exact authentication method may vary depending on your proxy provider. Some providers require account credentials, while others allow access by adding your IP address to a whitelist. For example, after purchasing a proxy from IPcook, you can find the required proxy details in your dashboard, including the proxy host, port, and authentication information. Having these details ready ensures you can move directly to the setup process without interruptions.
Windows 10 and Windows 11 include built-in proxy settings that allow you to configure a proxy server without installing additional software. The interface is slightly different between versions, but the setup process is almost the same.
Open "Start" and go to "Settings".
Select "Network & Internet", then open "Proxy".
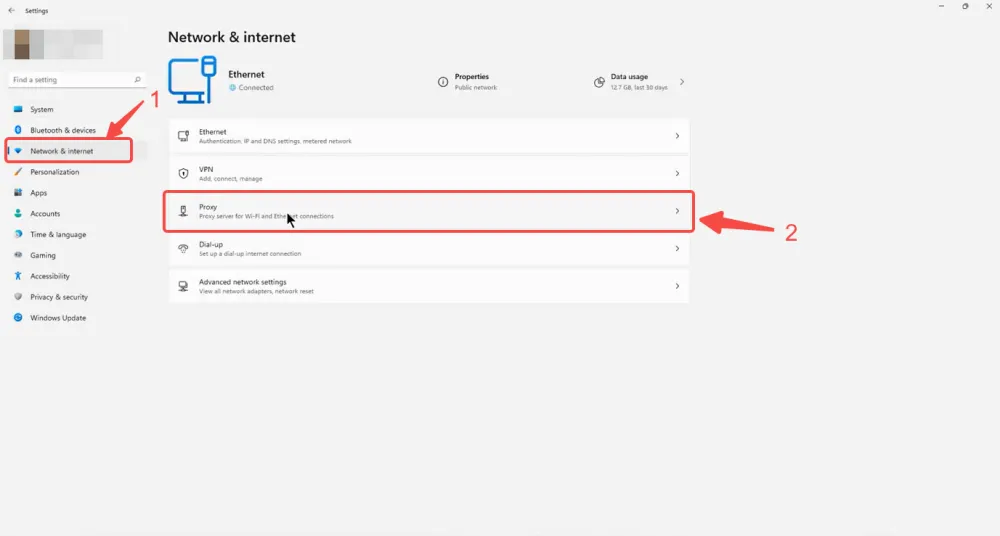
Under "Manual Proxy Setup", find "Use a Proxy Server" and click "Set up".
Turn on "Use a Proxy Server". Enter your proxy address and port, then click "Save" to apply the changes.
If your proxy provider uses username and password authentication, your browser or application may ask you to enter these credentials when connecting. If your provider uses IP whitelisting, you do not need to enter a username or password after your IP address has been approved.
💡For a more detailed walkthrough, check our guide on How to Configure Windows 10 & Windows 11 Proxy Settings
macOS allows you to configure proxy settings directly through network preferences. The exact menu names may vary slightly depending on your macOS version, but the overall setup process remains similar.
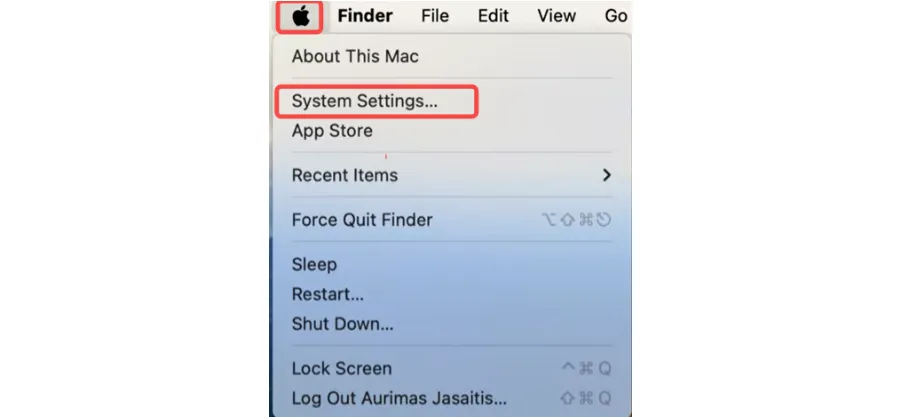
Step 1. Open System Settings from the Apple menu.
Step 2. Go to Network and select your active connection, such as Wi-Fi or Ethernet.
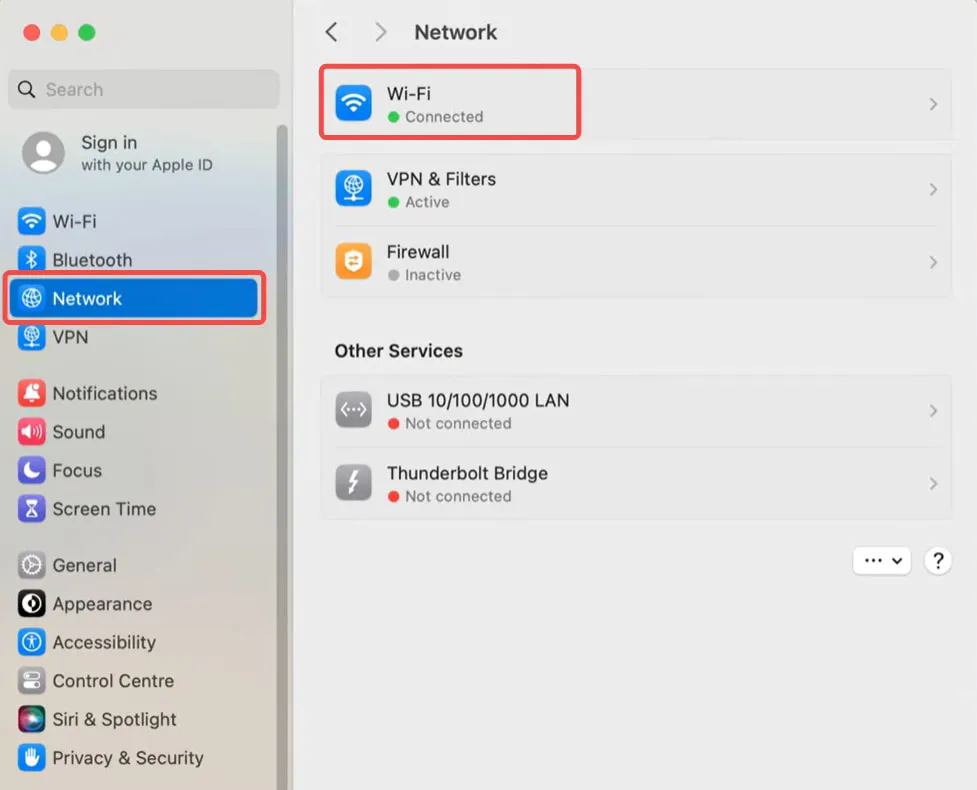
Step 3. Click Details. On older macOS versions, you may need to select Advanced → Proxies instead.
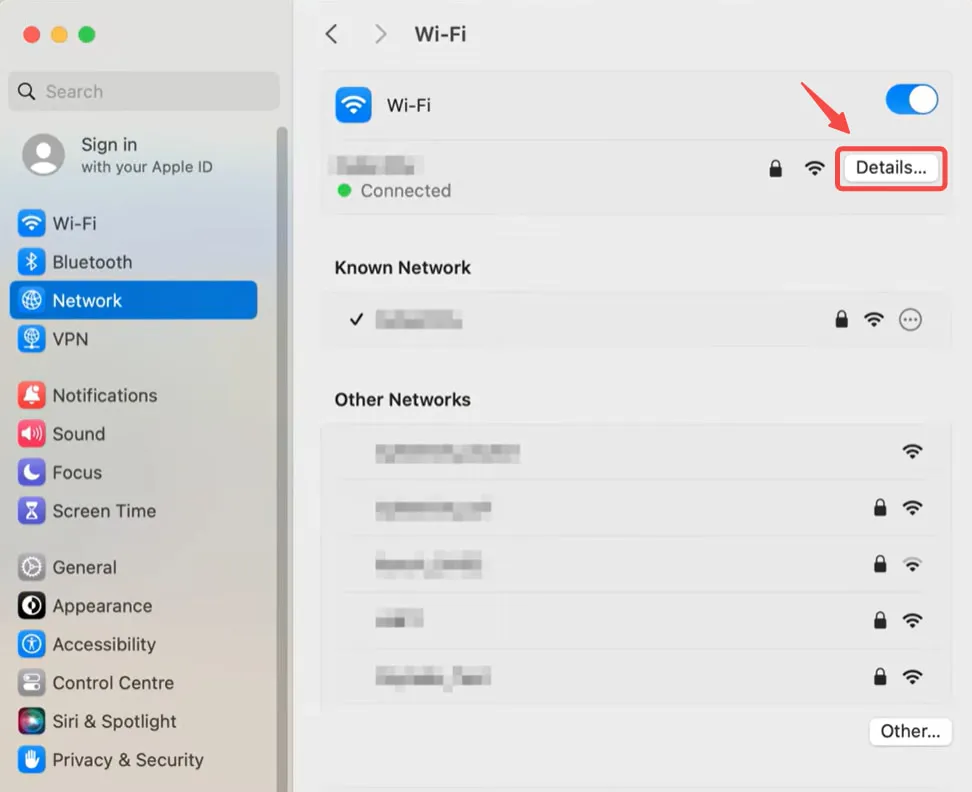
Step 4. Open the Proxies section and select the proxy protocol provided by your proxy provider, such as HTTP Proxy, HTTPS Proxy, or SOCKS Proxy.
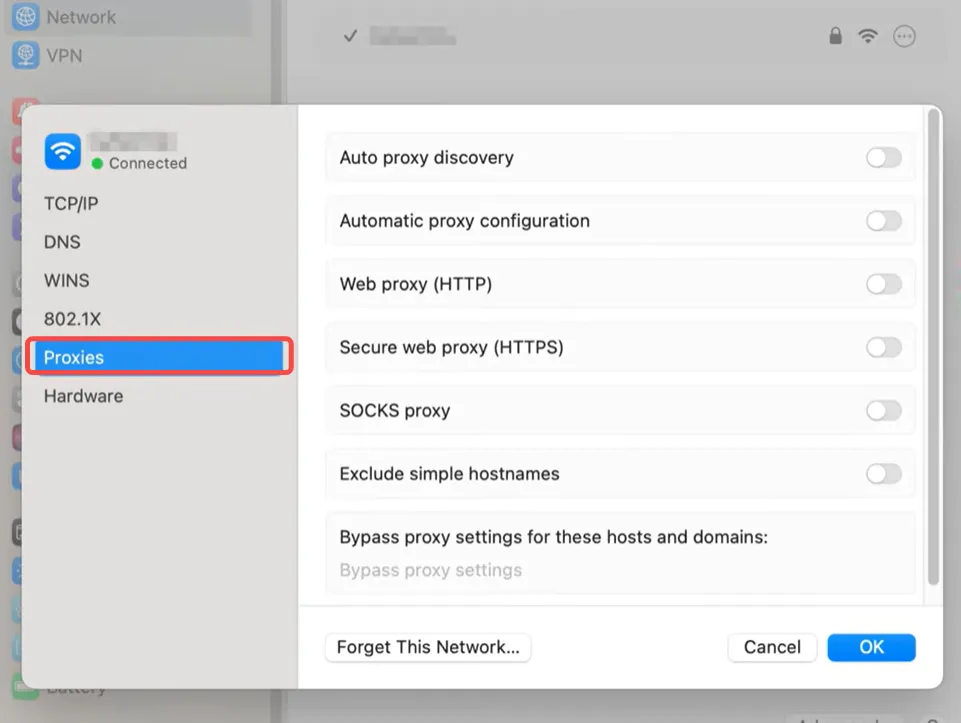
Step 5. Enter your proxy server address and port, then save the changes.
💡Tips: macOS supports several proxy options. Here's what they mean:
Web proxy (HTTP): Commonly used for web browsing and HTTP requests. It can also handle HTTPS connections through tunneling.
Secure web proxy (HTTPS): Used HTTPS/TLS encryption between your device and the proxy server. It does not mean the proxy encrypts the traffic passing through it with HTTPS.
SOCKS Proxy: Supports a wider range of applications and network connections beyond web traffic.
Linux proxy configuration depends on your distribution, desktop environment, and the applications you use. For example, Ubuntu and Debian may provide different system settings, while command-line tools and development applications may require separate proxy configurations.
Way 1. Configure Proxy Through Desktop Environment
For Linux systems with a graphical desktop environment:
Open System Settings.
Find Network or Proxy settings.
Select manual proxy configuration.
Enter your proxy address and port.
Apply the changes.
Way 2. Configure Proxy Through Command Line
Many Linux command-line tools use proxy environment variables to route traffic through a proxy server. You can configure a temporary proxy session by setting variables such as:
export http_proxy=http://proxy_address:port
export https_proxy=http://proxy_address:port
If your proxy requires authentication, include your username and password in the proxy details. To keep the proxy settings after restarting the terminal, add the variables to your shell configuration file. Keep in mind that some applications, such as Git or package managers, may require separate proxy settings.
Mobile devices can connect to proxy servers via built-in network settings, especially when using Wi-Fi. However, system-level proxy settings usually apply only to the selected Wi-Fi connection, not to all mobile traffic.
On iOS devices, built-in proxy settings are available only for Wi-Fi connections. If you need to route cellular traffic through a proxy, additional tools or configurations may be required. Follow the steps below to set up a proxy on your iPhone or iPad.
Step 1. Open Settings on your iPhone or iPad.
Step 2. Tap Wi-Fi and select the connected network.
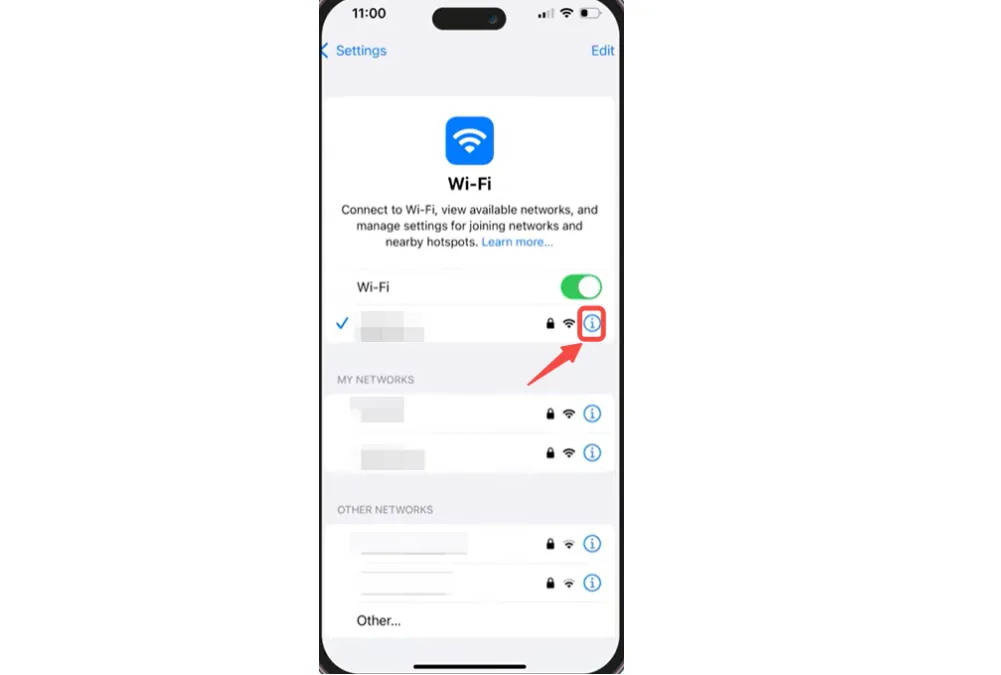
Step 3. Scroll down and select Configure Proxy.
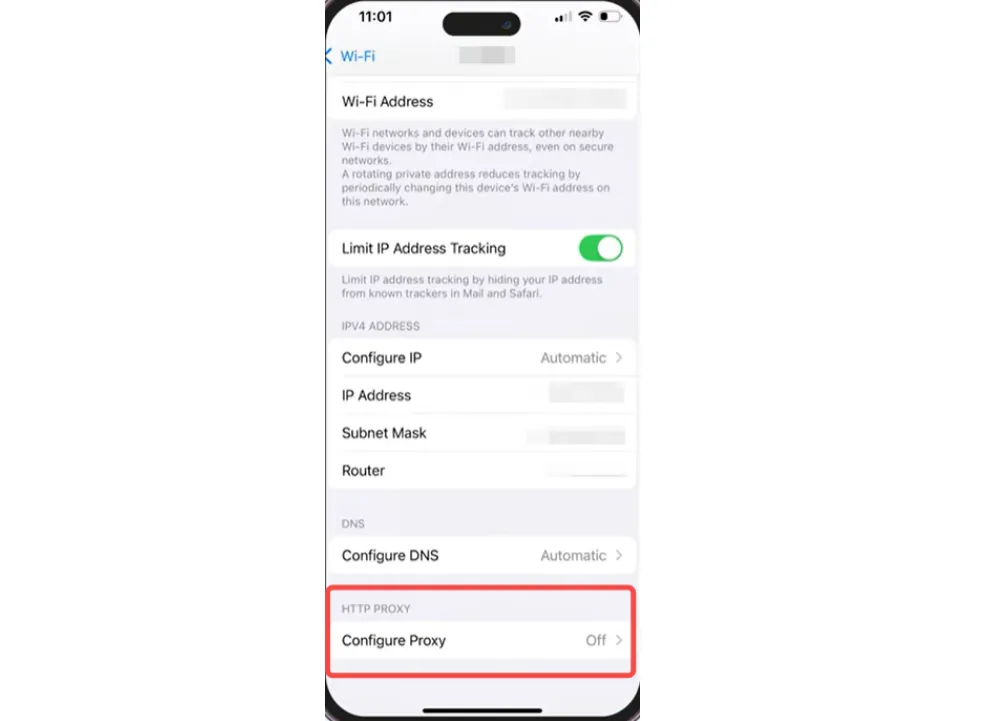
Step 4. Choose Manual.
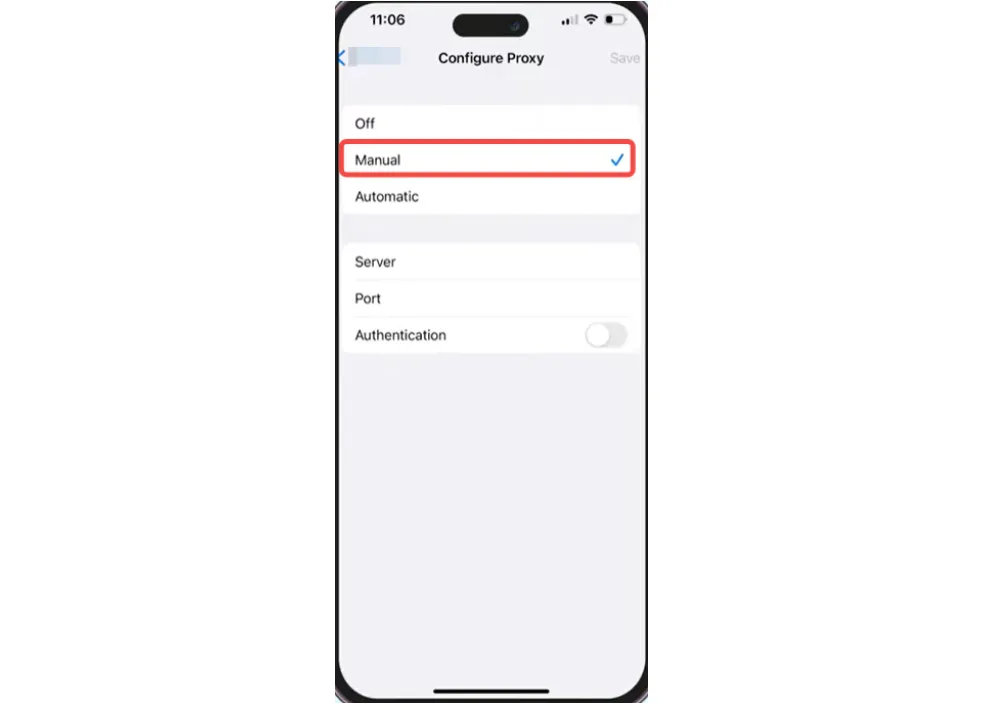
Step 5. Enter your proxy server address and port. If required, enable Authentication and enter your username and password.
Android proxy settings may vary slightly depending on the device manufacturer and Android version. In most cases, you can configure a proxy through your Wi-Fi settings by following similar steps.
Open Settings and go to Wi-Fi settings.
Select your connected Wi-Fi network.
Open Proxy Settings and select Manual Proxy Mode.
Enter the proxy hostname and port.
Save Proxy Settings.
💡For more details, see our How to Set Up Proxy Settings in Android
You can use a proxy server by configuring proxy settings directly in your browser. This method allows you to route browser traffic through a proxy without affecting other applications on your device.
The setup process varies depending on the browser you use. Follow the steps below to configure a proxy in Firefox, Chrome, or Edge.
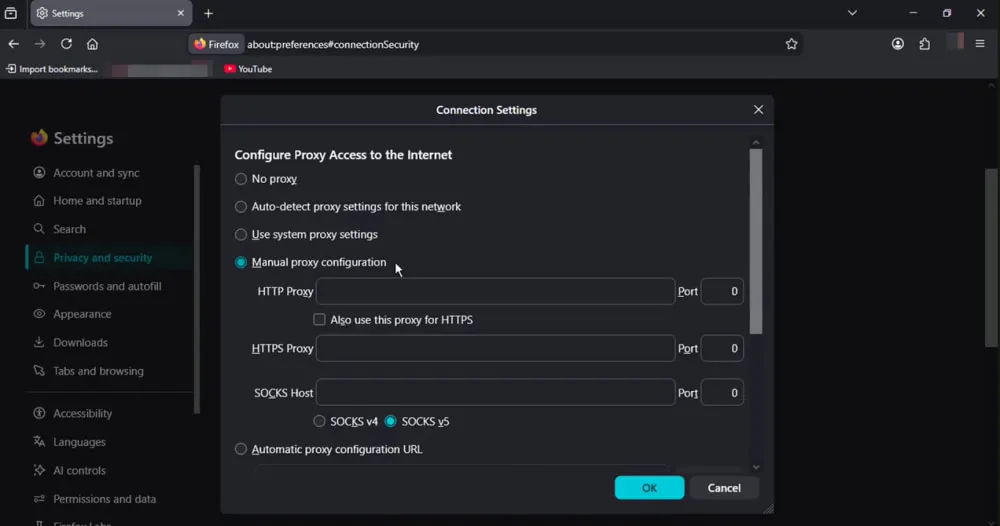
Firefox provides its own proxy configuration options, allowing users to configure proxy settings separately from system settings.
To configure a proxy in Firefox, follow these steps:
Step 1. Click the Menu Icon in the top-right corner of Firefox and select Settings.
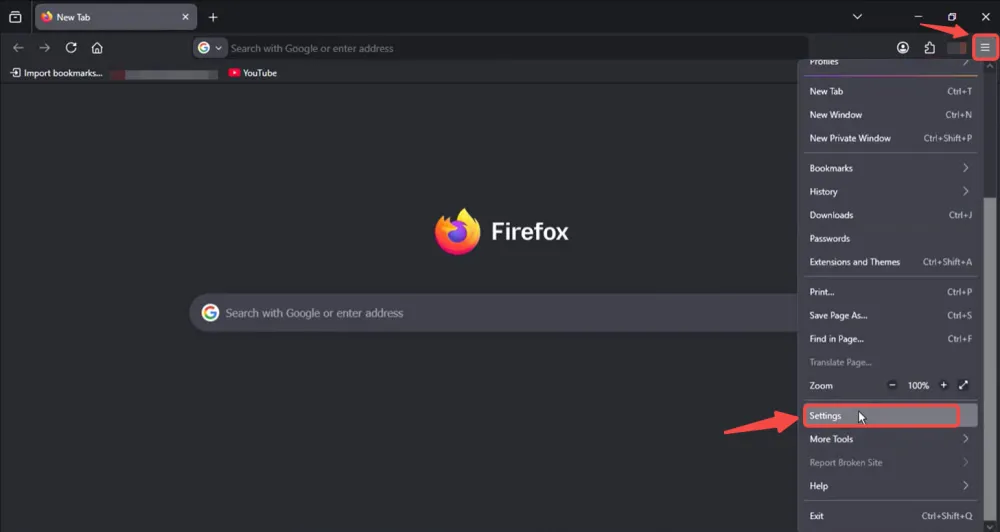
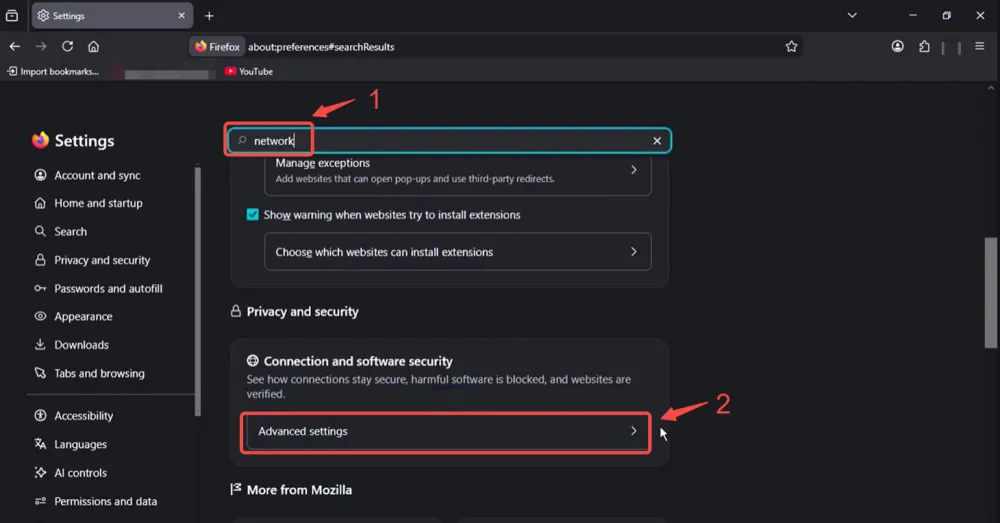
Step 2. Search for "Network" and Open Advanced Settings.
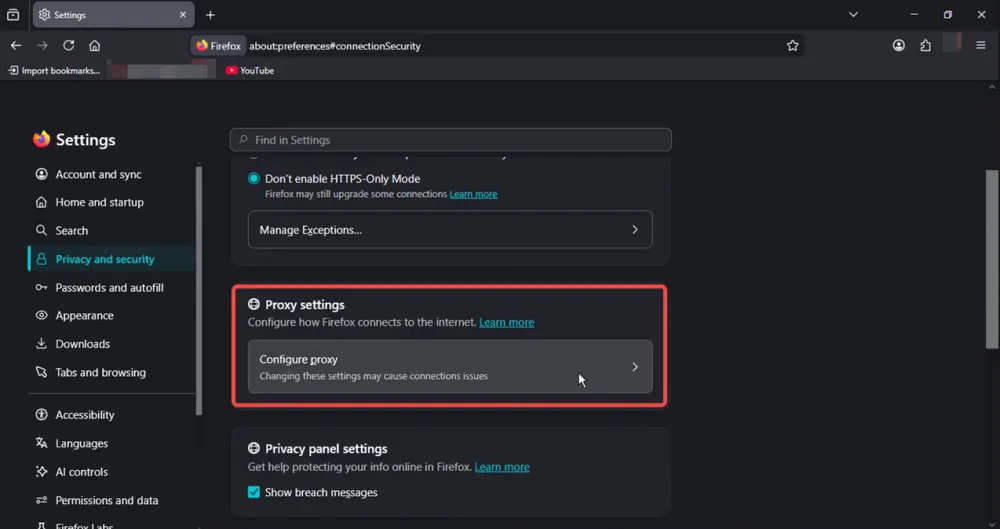
Step 3. Scroll down and select Configure Proxy.
Step 4. Enter your proxy information and click OK to save
Chrome and Edge typically rely on your system proxy settings rather than providing their own built-in proxy settings. Follow these steps to configure a proxy:
Open Chrome or Edge Settings.
Go to System settings and open your device's proxy settings.
Enable manual proxy configuration.
Enter your proxy address and port.
Save the changes.
💡For detailed setup instructions, see the following guides:
How to Set Up Proxy Settings in Microsoft Edge: Two Quick Methods
After configuring a proxy server, verify that your connection is working properly to ensure your traffic is being routed through the proxy as expected.
You can check your proxy connection by:
Visiting an IP checking website and comparing your current IP address with your original IP address.
Confirming that the detected location or ISP information matches your expected proxy details.
Testing whether your browser or application can access the internet through the proxy connection.
If your IP address has not changed, review your proxy address, port, authentication method, and network settings. You should also confirm that the proxy server is available and configured correctly.
Whether you are setting up a proxy for the first time or looking to replace an unreliable service, choosing a trusted proxy provider is key to achieving stable performance. Proxies can be obtained from professional proxy providers, marketplace platforms, or private proxy networks. Among these options, professional proxy providers are usually the preferred choice because they offer verified IP sources, stable infrastructure, and dedicated support.
IPcook provides reliable proxy solutions with large IP pools, flexible targeting options, stable connections, and support for various use cases. Its proxy network includes Residential Proxies, ISP Proxies, and Datacenter Proxies.
Residential Proxies
IPcook Residential Proxies provide access to 55M+ IPs across 185+ locations, sourced from ethically sourced residential networks. With HTTP and SOCKS5 support, it is compatible with a wide range of clients and automation tools. Flexible free geo-targeting and reliable performance make it suitable for SEO monitoring, ad verification, and other location-based tasks.
IPcook also provides one-line API integration and usage monitoring tools to simplify proxy management. Flexible pricing options include pay-as-you-go plans starting from $0.3/GB for flexible usage and subscription plans for users who need predictable costs and consistent proxy access.
ISP Proxies and Datacenter Proxies
IPcook ISP Proxies and Datacenter Proxies provide unlimited bandwidth with no traffic expiration, allowing you to maintain stable access without worrying about usage limits. With 99.9% uptime and low latency, you can enjoy fast and consistent proxy performance for various use cases.
You can get started quickly with simple registration and a three-step setup process. If you need assistance, 24/7 customer support is available to help you resolve any issues. Detailed setup videos are also provided to guide you through the configuration process.
Setting up a proxy server may seem complicated at first, but the process becomes much easier once you have the right proxy type and connection details ready. Whether you are configuring a proxy on Windows, Mac, Linux, mobile devices, or browsers, following the proper steps can simplify the setup process and help you get connected quickly.
If you are still looking for a reliable proxy provider, IPcook offers residential, ISP, and datacenter proxy solutions designed to support various use cases and setup requirements.