

Ghost Browser makes it easy to manage multiple accounts without constant logouts or cookie conflicts. It lets users run separate sessions and profiles side by side, making multi-account management seamless.
But to unlock its full potential, you need proxies. Ghost Proxy gives each session its own IP address, keeping accounts safe from bans and improving privacy. In this guide, we’ll show you how to set up Ghost Proxy in Ghost Browser, covering single proxy setup, bulk import, and IP rotation for scalable, secure browsing.
A Ghost Proxy isn’t a standalone product or brand. It’s simply the way you use proxies inside Ghost Browser to give each tab, session, or workspace its own IP address.
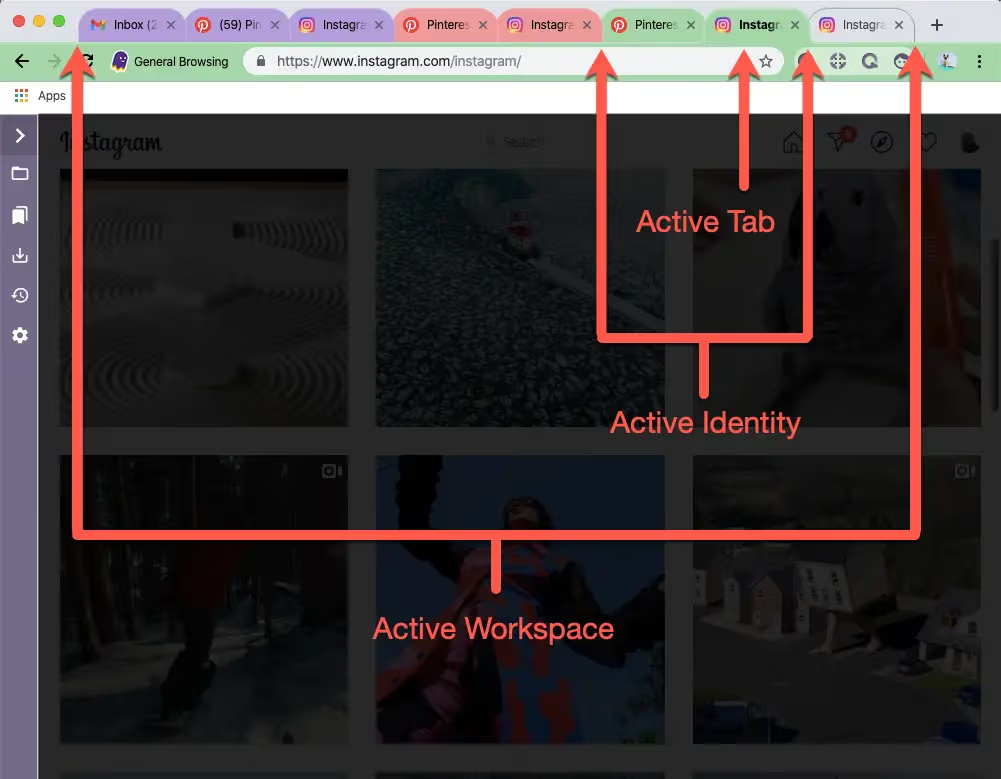
Think of it like this: every tab wears a different “mask.” One tab could look like it’s browsing from New York. Another might appear in London. A third could show up in Tokyo. All of this happens inside the same browser window, thanks to the Ghost Proxy Control extension.
With Ghost Proxy Control, you can:
Assign a unique proxy to each tab, identity, or workspace
Choose between residential, datacenter, or SOCKS5 proxies
Rotate IPs automatically, or keep them “sticky” for up to 24 hours
Manage large proxy lists with simple CSV import
Without proxies, Ghost Browser still shows the same IP across all sessions. That means:
Social media accounts may get flagged or banned for “suspicious activity”
Market research and pricing data could be biased because it all resolves from one region
SEO monitoring and ad verification tasks risk being blocked or flagged
With Ghost Proxy, every session looks completely independent. It’s like running multiple browsers on different computers—except faster, safer, and all in one place.
| Regular Proxy | Ghost Proxy (in Ghost Browser) |
|---|---|---|
Scope of use | Whole system | Each tab, identity, or workspace |
Multi-account | Limited | Fully supported |
IP management | Manual switch | Auto-assign, rotate, or stick |
Ghost Proxy makes Ghost Browser a true multi-account solution by giving you session-level IP control that standard proxies can’t match.
Now that you know what a Ghost Proxy is and why it matters, the next step is choosing the right provider. Here’s the kicker: your experience depends almost entirely on who you pick.
Picking the right ghost proxy provider isn’t just about convenience. It’s the difference between smooth, secure browsing and constant headaches. Here’s what really matters.
When evaluating providers, focus on a few essentials:
IP Pool Size & Diversity: The bigger and more global the pool, the fewer bans you’ll face. Millions of residential IPs across 100+ countries give you true flexibility.
Speed & Reliability: Low latency and 99.9% uptime are non-negotiable. If proxies lag, your accounts or SEO tasks will too.
Anonymity Level: Look for elite proxies that strip headers completely. That way, your sessions look like real users, not proxies.
Rotation & Sticky Sessions: Rotate IPs per request for scale. Stick with one IP for up to 24 hours when you need stability.
Ease of Use: CSV import, a clean dashboard, and simple API integration save time and keep workflows organized. Integration with Ghost Proxy Control makes it even easier inside Ghost Browser.
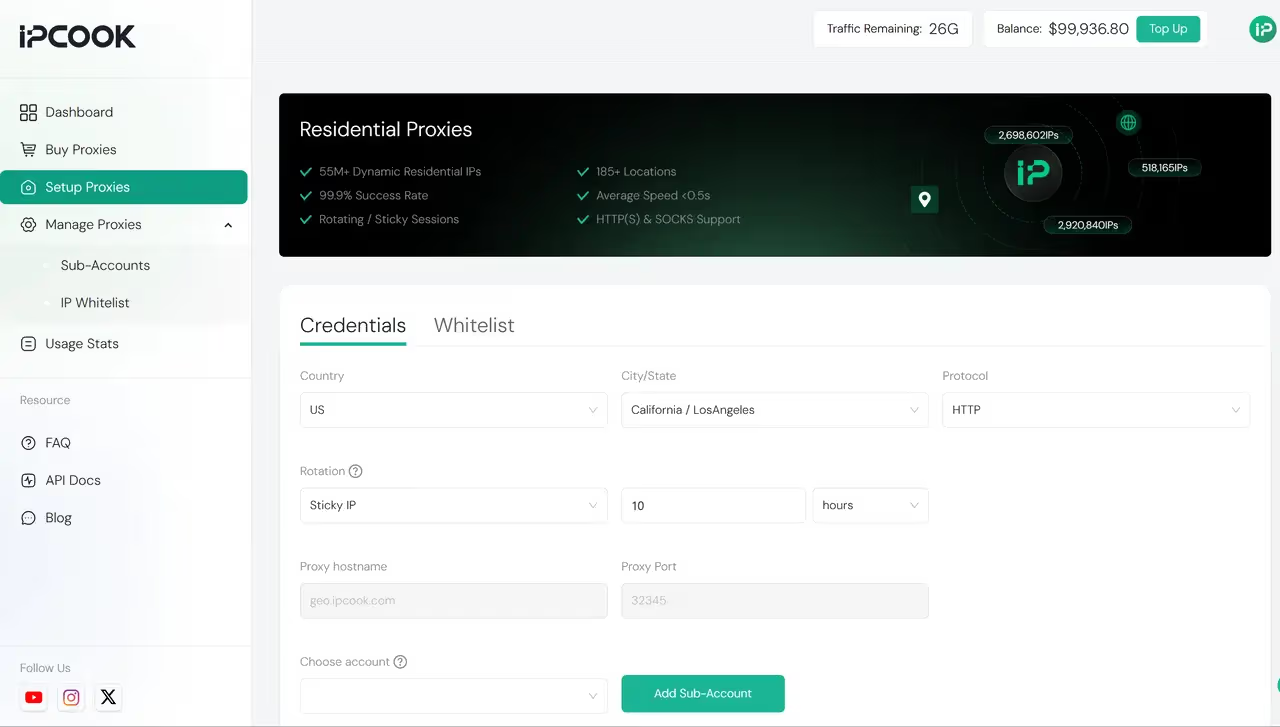
For a trusted ghost proxy solution, IPcook checks every box:
55M+ real residential IPs across 185+ countries
Ultra-fast response times with a global average under 0.5s, as low as 50ms in key regions
Elite anonymity with no proxy headers, indistinguishable from real users
Flexible sessions that rotate on every request or stay sticky for up to 24h
User-friendly dashboard with CSV import and up to 10 free sub-accounts
GDPR-compliant sourcing for safe, ethical usage
What does this mean in practice? Less time stressing about bans, fewer workflow breaks, and more focus on the campaigns that actually grow your business. With affordable starting plans, IPcook offers premium quality without the premium cost. That’s why thousands of Ghost Browser users rely on IPcook to keep their sessions safe, stable, and scalable.
Setting up a proxy in Ghost Browser is easier than you think. Whether you're managing social media, scraping data, or testing ads, the Ghost Proxy Control extension makes it all seamless.
Follow this step-by-step guide to configure your proxies correctly and avoid common mistakes.
Launch Ghost Browser. In the top-right toolbar, click the Ghost Proxy Control icon, your hub for managing proxies. This opens the proxy panel, where you can add, assign, and manage all your IPs in one place.
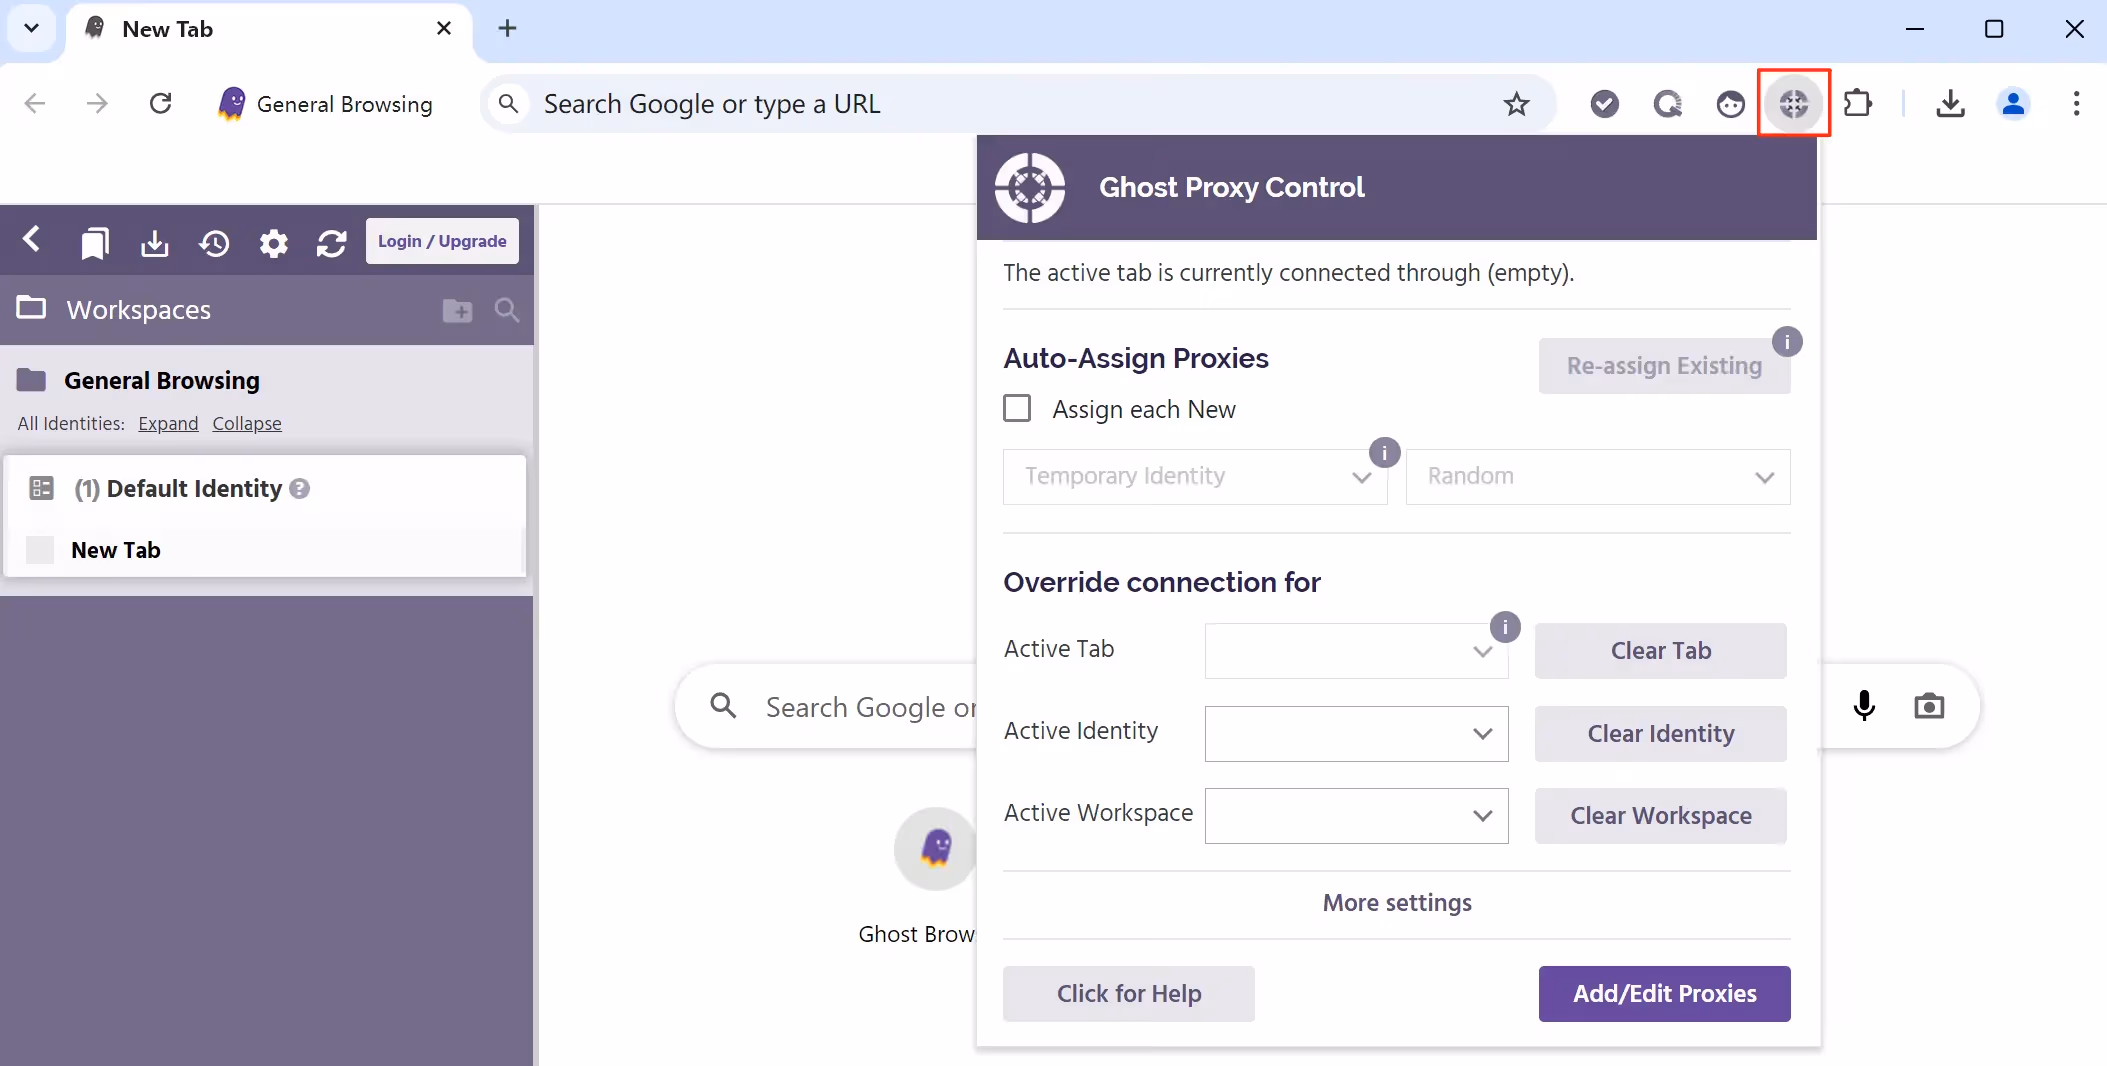
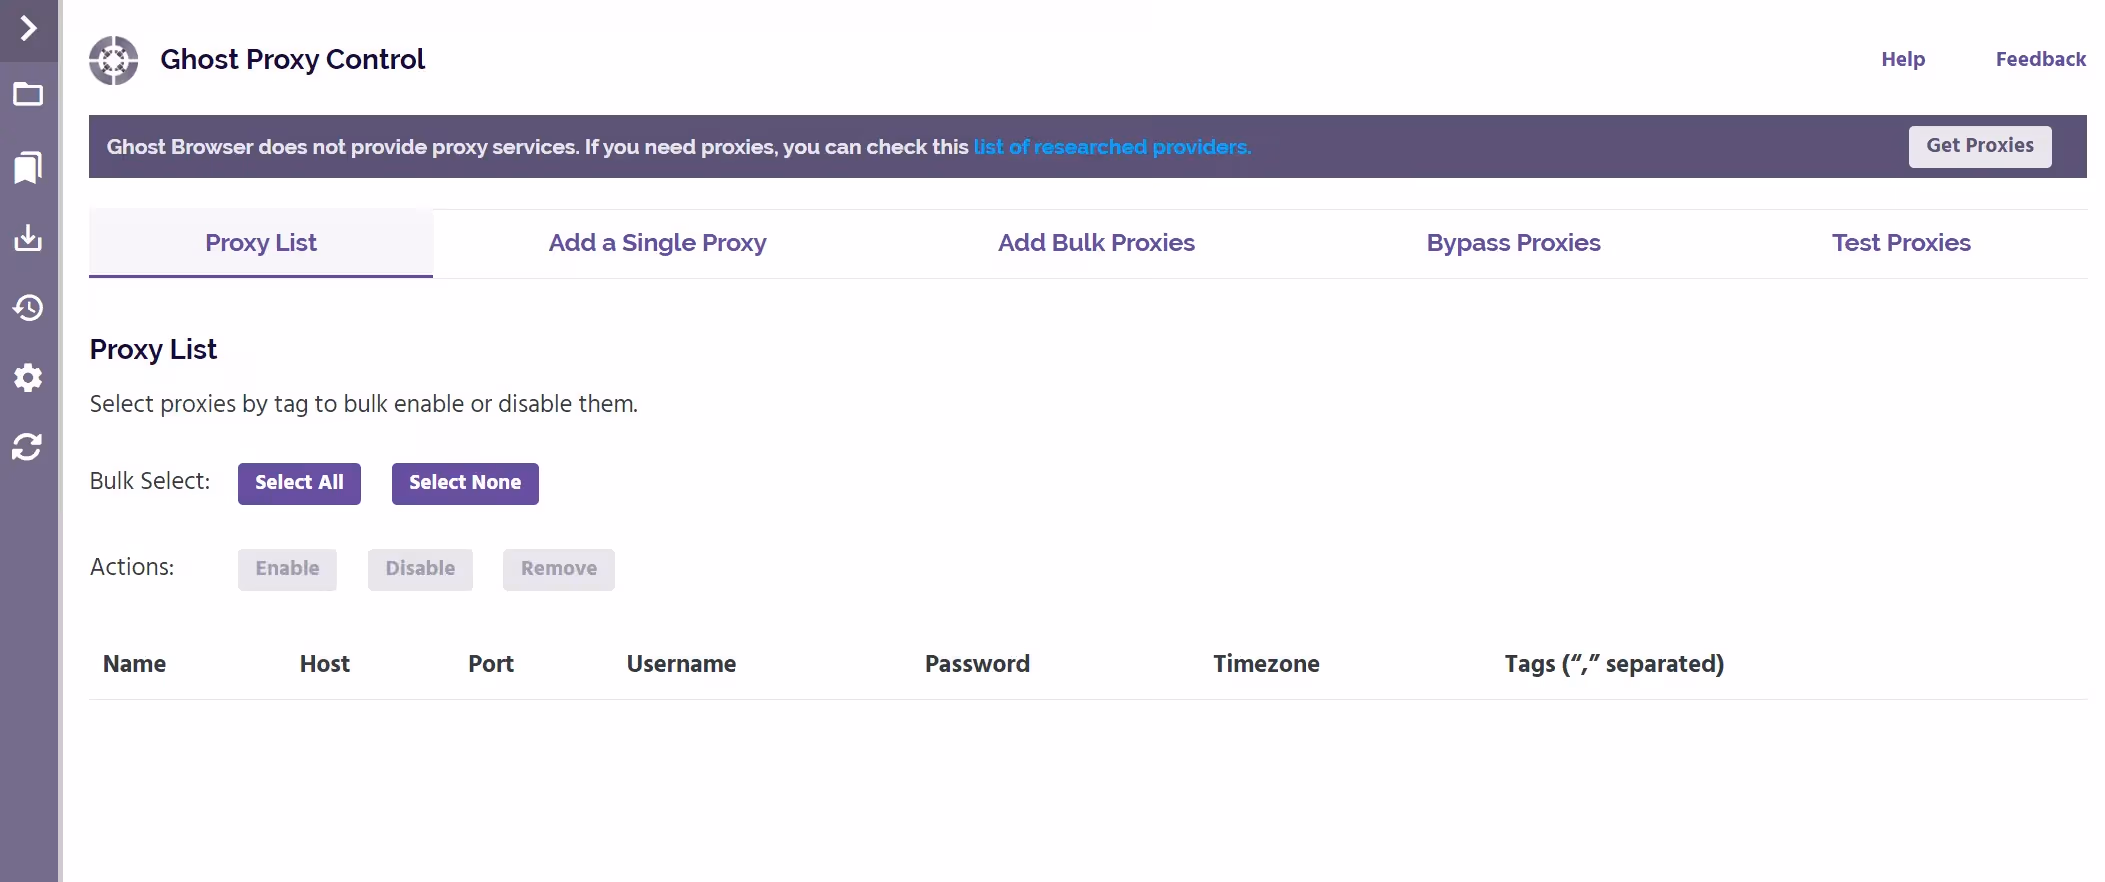
Click Add/Edit Proxies to open the proxy management panel. From here, you have two ways to add proxies:
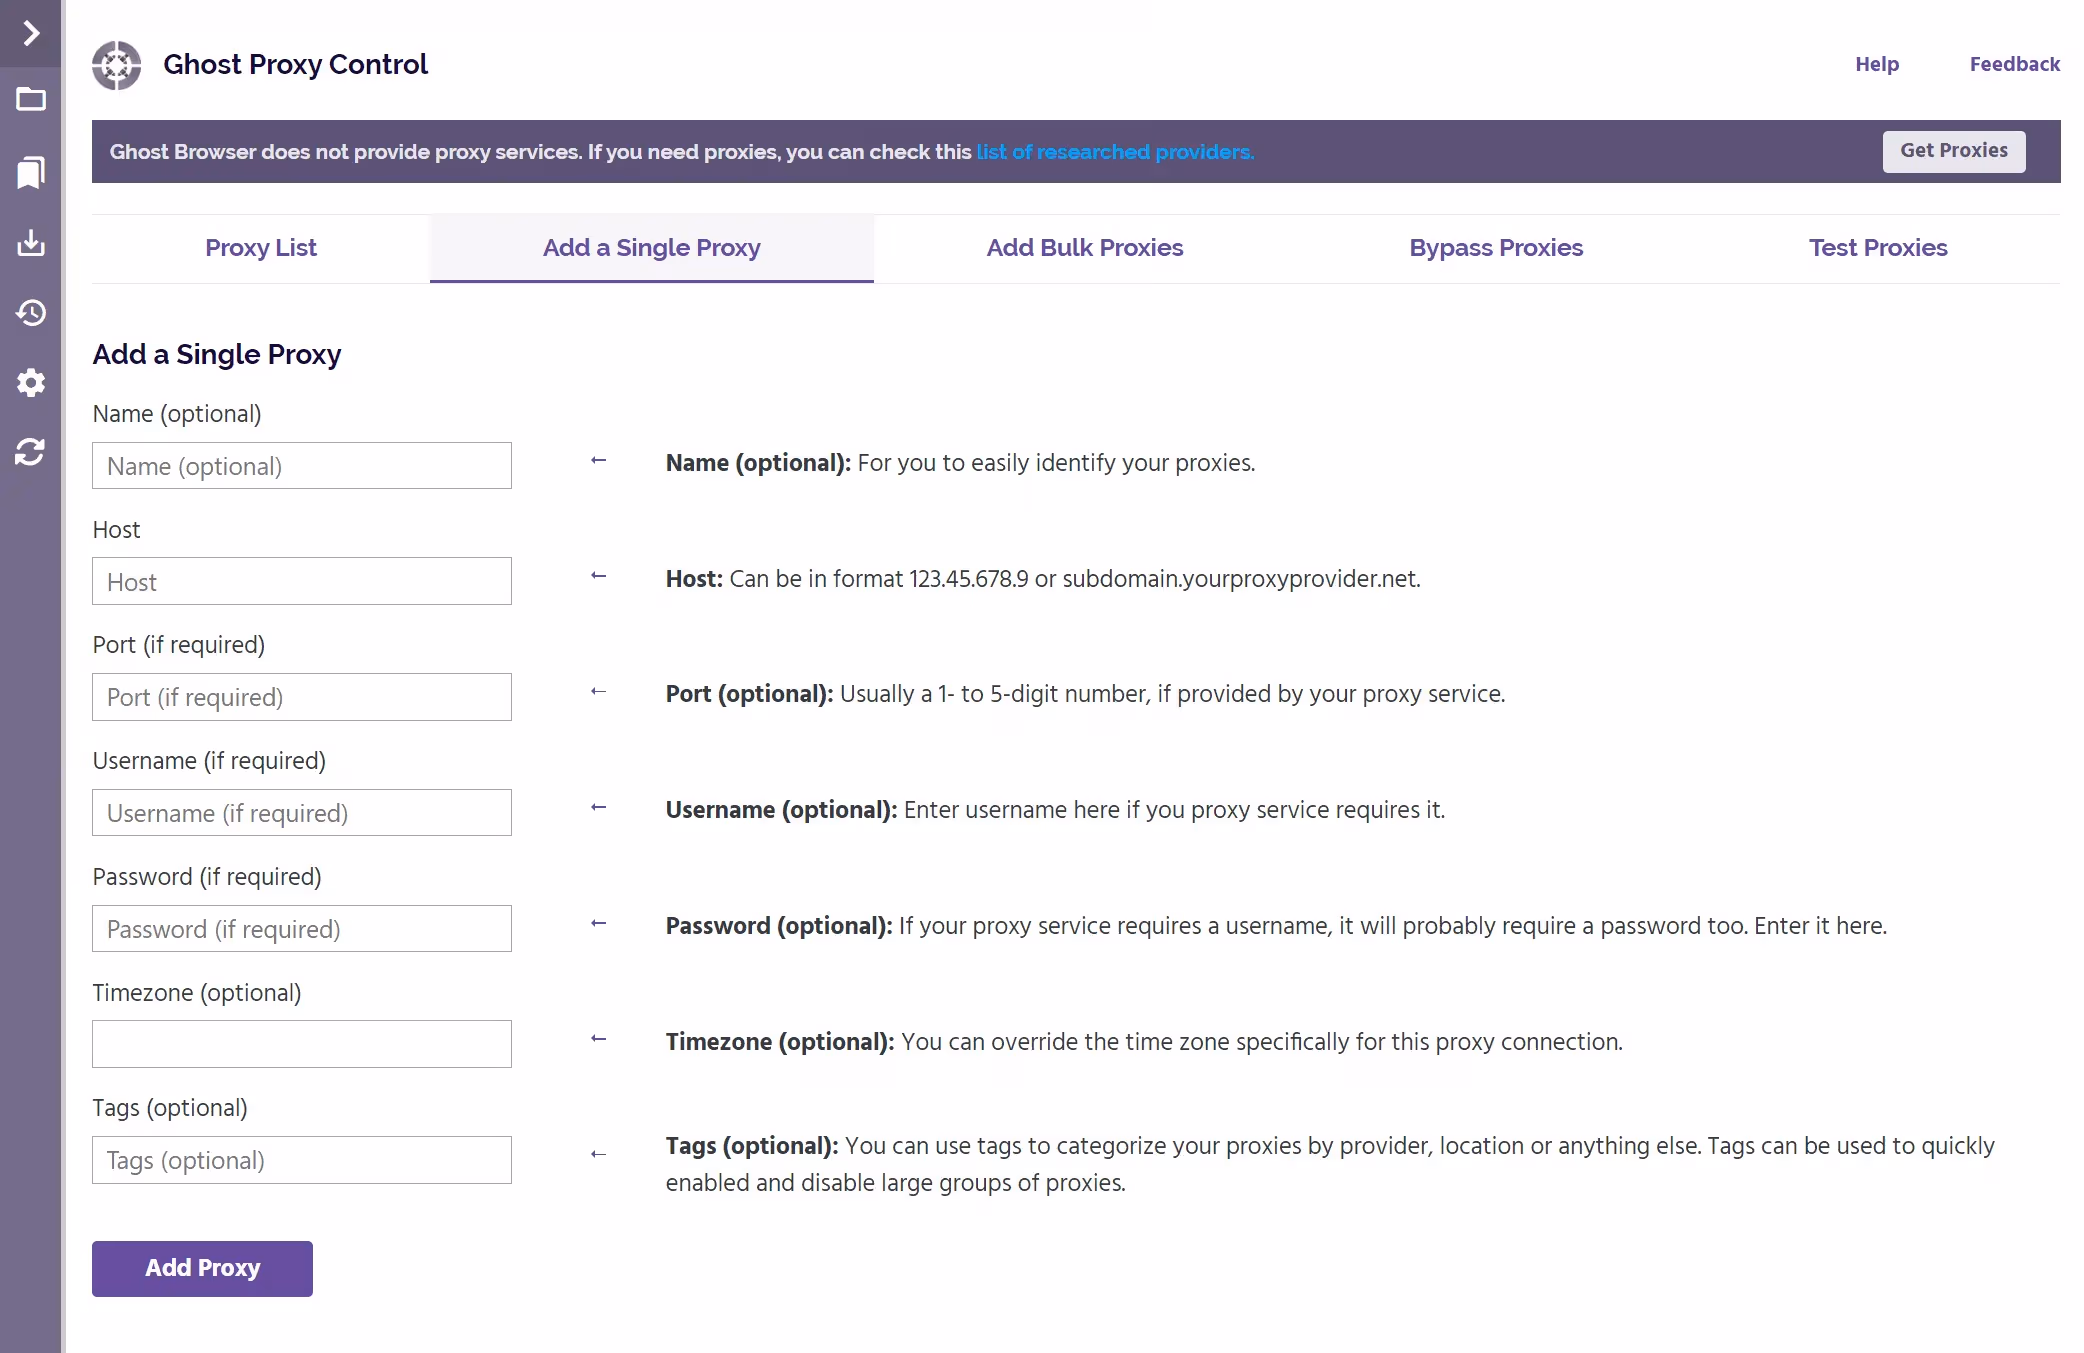
On the Add a Single Proxy tab, you can enter your proxy details one by one, including:
Host (proxy IP address, e.g., geo.ipcook.com)
Port (usually 4–5 digits, e.g., 32345)
Username & Password
(Optional) Timezone and Tags to better organize your proxies
This method is ideal if you only need to add a few proxies or want to test that a proxy is working correctly.
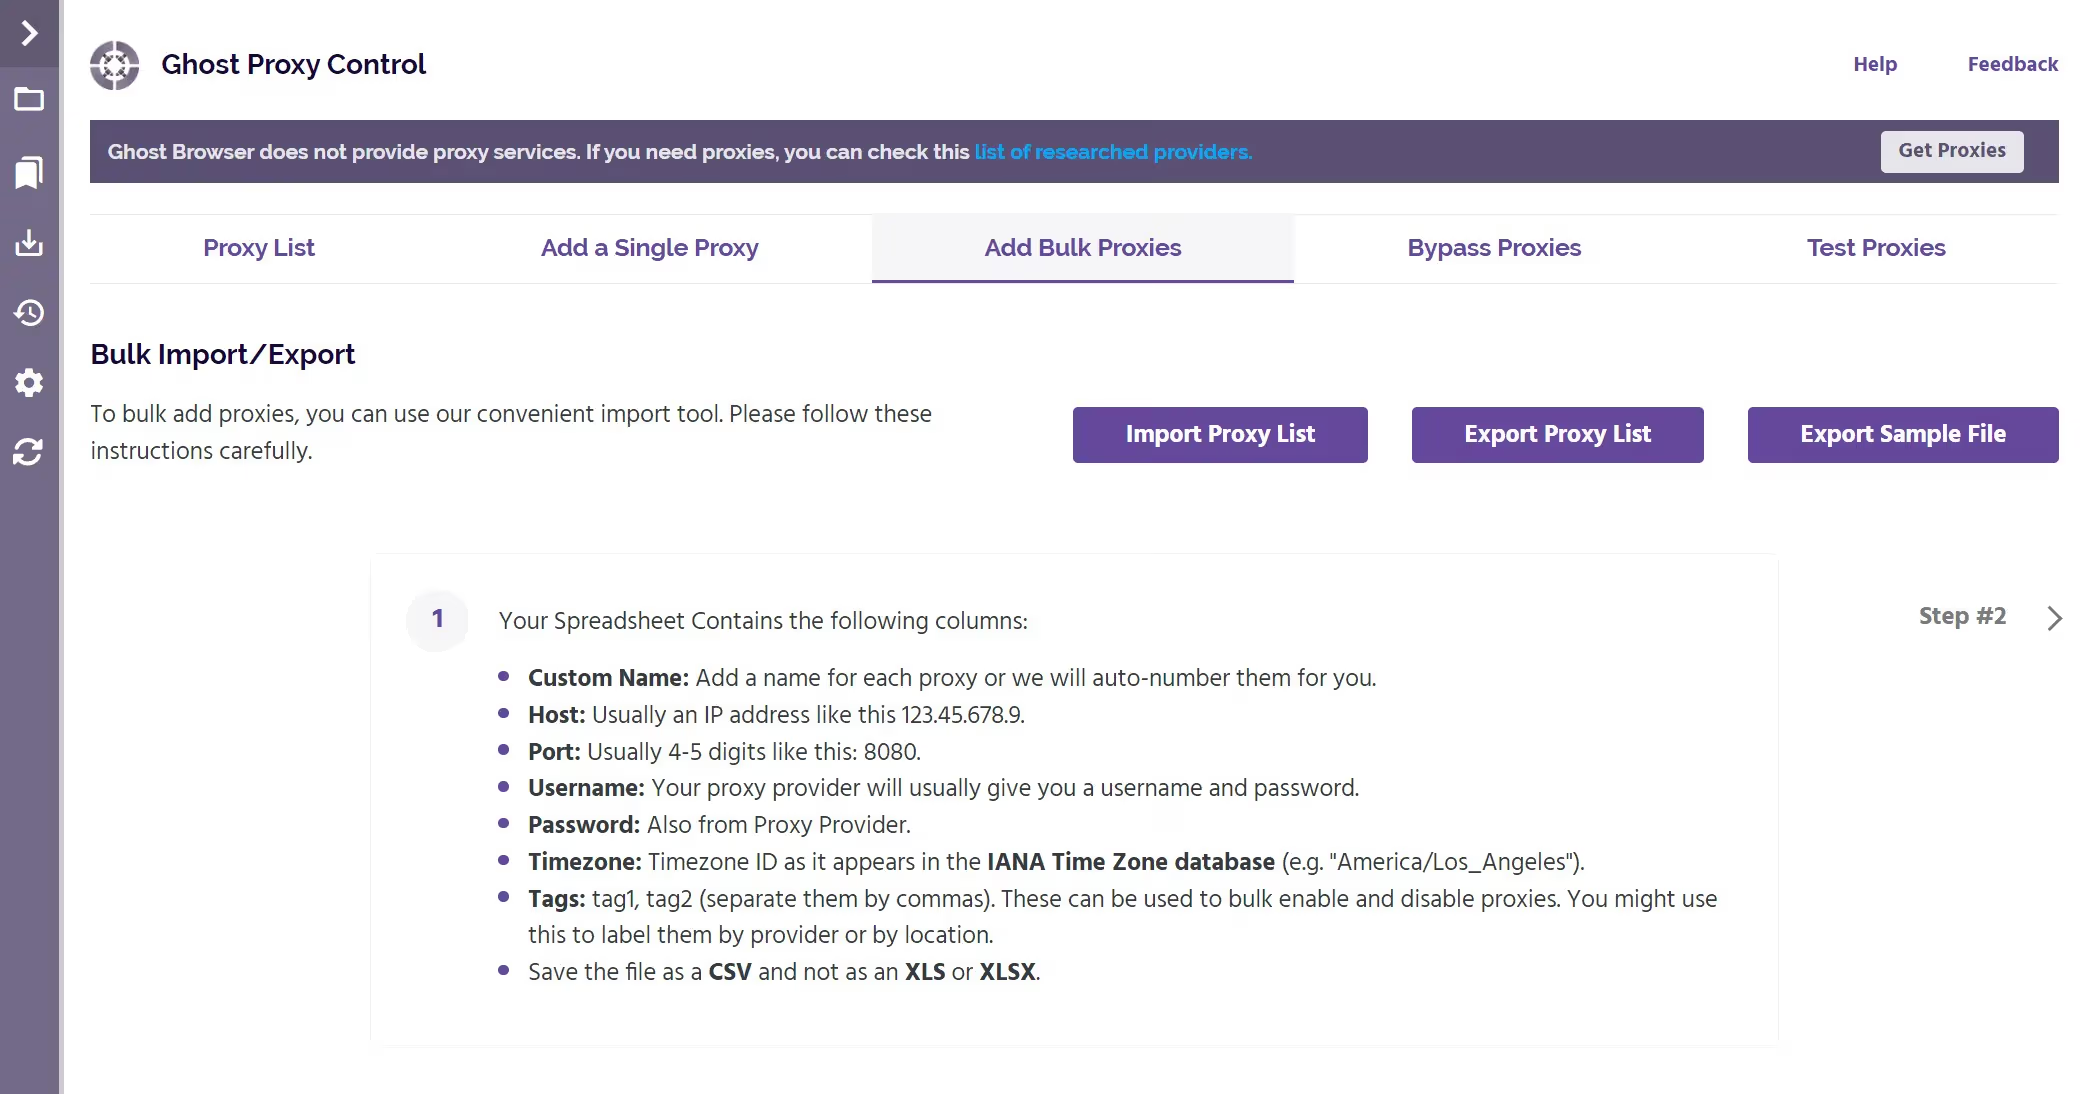
On the Add Bulk Proxies tab, you can upload a CSV file containing many proxies at once. Ghost Proxy Control also provides a sample CSV file that you can download and use as a template.
Your spreadsheet should include:
Host (proxy IP address, e.g., geo.ipcook.com)
Port (usually 4–5 digits, e.g., 32345)
Username & Password
(Optional) Timezone and Tags for easier management
This option is perfect for larger workflows, such as managing multiple accounts, running marketing campaigns, or scaling up data collection.
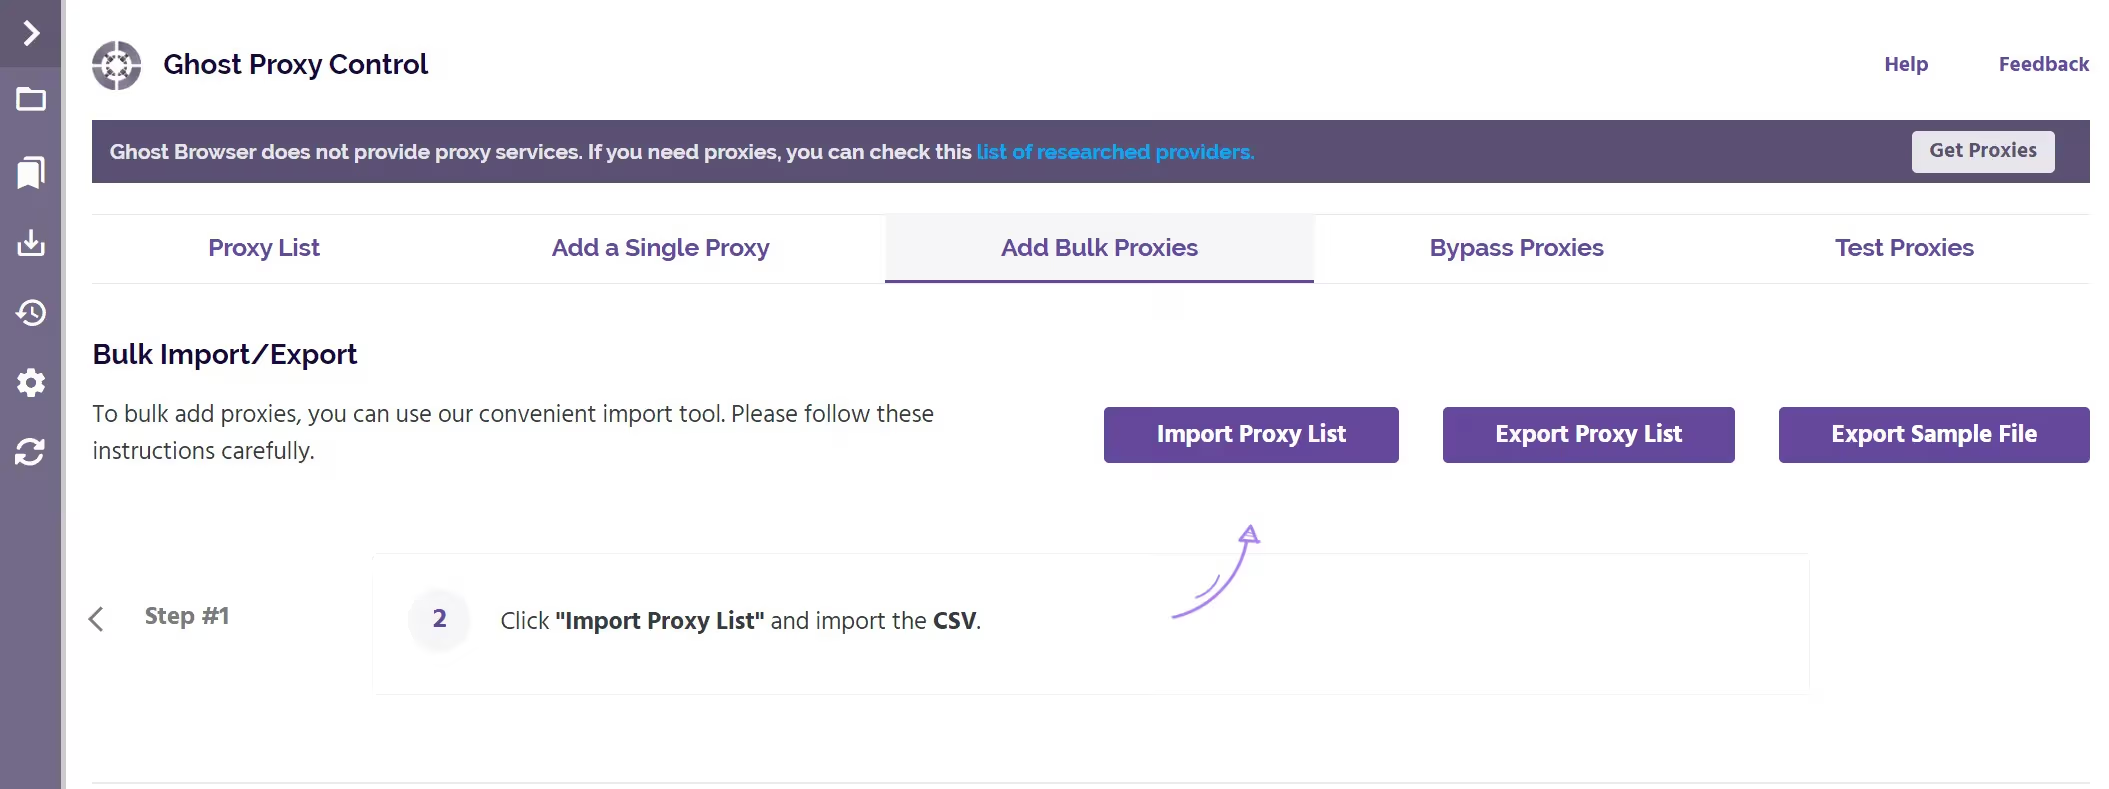
Next, click Import Proxy List to upload your CSV and instantly add all proxies.
Use the Bypass Proxies tab to let specific websites skip the proxy and connect directly. This is handy for trusted sites such as email, banking, or internal portals.
Use the Test Proxies tab to verify your proxies. Enter a target URL, click Test, and Ghost Proxy Control will check which proxies in your list are working.

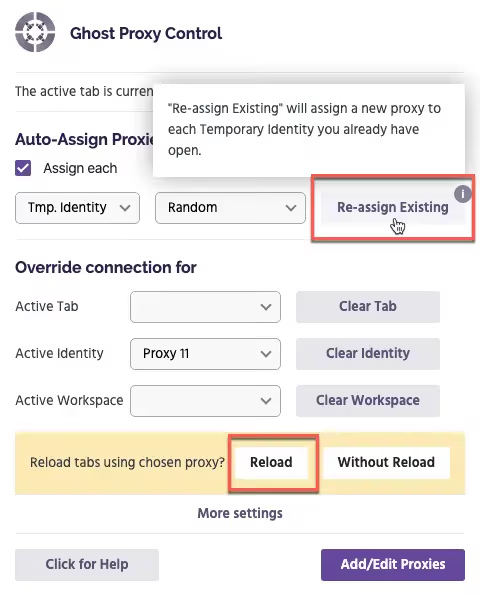
Ghost Proxy Control provides flexible options for managing your proxies:
Auto-Assign. New tabs automatically receive proxies, either randomly or sequentially.
Rotation. You can change IPs at fixed intervals or step through your proxy list in order.
Sticky Sessions. A single proxy can remain active for up to 24 hours, which is useful for logins or long sessions.
This setup makes it easy to switch between high-frequency scraping tasks and stable account management without manual intervention.
By now, you know exactly how to set up Ghost Proxy in Ghost Browser. With session-level IP control, auto-rotation, and sticky options, managing multiple accounts becomes smooth and secure.
If something isn’t working as expected, a quick IP test or credential check usually clears things up. And if you pair Ghost Browser with a reliable provider like IPcook, you’ll have a stable, scalable solution from day one.
You’ve set up your proxies, and now it’s time to use them effectively. These best practices will help you stay anonymous, avoid bans, and maintain a smooth browsing experience.
Assign a unique IP to each tab or identity.
Never reuse the same IP across multiple accounts
For teams, assign separate IPs and workspaces to each task
This keeps your sessions isolated and reduces account linkage
Use sticky IPs for logins or sessions that need consistency
Enable rotation for scraping or high-frequency tasks
Avoid rotating too fast—mimic real user behavior instead
Smart timing helps you stay under the radar without sacrificing stability
Avoid shared proxies that risk bans
Look for uptime guarantees and clean, fast IP pools
Configuring Ghost Proxy inside Ghost Browser unlocks its full potential. With unique IPs per tab, intelligent rotation, and the right proxy type, you can manage multiple accounts securely and efficiently while minimizing the risk of bans.
For users who want top performance without complexity, IPcook provides a reliable and scalable solution. Its real residential IPs, fast response times, and seamless compatibility with Ghost Proxy Control make it the perfect match for both individuals and teams.

