How to Create a Twitter Bot Without Code or With Python

A Twitter bot, also known as an X bot, can publish scheduled posts, share updates from websites or APIs, and respond to specific events automatically. Twitter permits bots that follow its automation rules but prohibits spam, automated likes, unsolicited mass replies, and engagement manipulation.
To automate your Twitter workflow, you need to set up a bot and connect it to the tasks you want it to perform. This guide shows you how to create a Twitter bot in 2 ways. You can use a no-code platform for a simpler setup or Python for more control over content, triggers, and scheduling.
Decide What Your Twitter Bot Will Do
Twitter bots can handle a range of tasks, from scheduling posts and sharing new content to monitoring changes, sending alerts, and answering common questions. The best way to build one depends on the task you want to automate. The table below shows common bot uses, examples, and the approach that fits each one best.
Common Bot Usage | Example | Recommended Option | Why |
Schedule posts | Share a daily tip or reminder at a set time | No-code tool | Basic scheduling does not require custom code |
Share new content | Publish a post when an RSS feed or website is updated | No-code tool | Visual workflows can connect the content source to Twitter |
Monitor and send alerts | Post when a price, service status, or other value changes | Python | Custom conditions may require data processing |
Reply to defined triggers | Respond after someone opts in or takes a specific action | Python or a supported no-code tool | Replies need clear triggers and policy controls |
A no-code tool works well when the trigger and output follow a fixed pattern. Python is more suitable when your bot needs custom data, multiple conditions, a posting queue, or more control over errors.
How to Create a Twitter Bot Without Code
No-code Twitter bots are usually built with automation tools that provide a visual interface and prebuilt service connections. Instead of writing API requests or maintaining a Python script, you choose the event that starts the workflow, select the action that follows, and connect the required accounts.
You still need to review permissions and complete the relevant fields, but the platform handles the underlying integration. The example below uses IFTTT, where these workflows are called Applets, to show the standard setup process.
Step 1. Sign in to IFTTT, choose a Twitter trigger, and click Create trigger to start a new Applet.

Step 2. Click Add next to Then That. Choose the action that sends a notification through the IFTTT app. Edit the message to include available details such as the follower's name, username, or profile link. Click Create Action to save it. Additional actions can be added if needed.
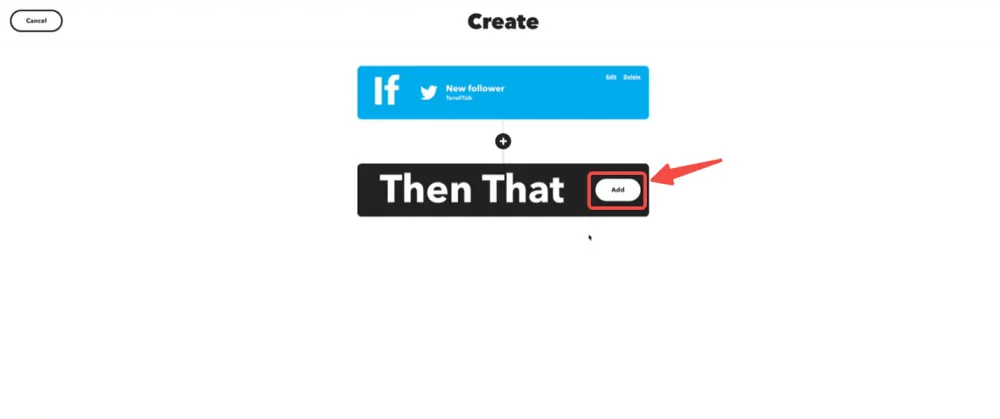
Step 3. Review the trigger, action, connected accounts, and completed fields. Give the Applet a clear name and make sure it is turned on. After the trigger occurs, open the Applet's Activity page to confirm that each action ran successfully.
How to Make a Twitter Bot With Python
Python gives you more control over what your Twitter bot publishes and when it runs. The example below uses the current official Python XDK. It reads posts from a local queue and publishes them one at a time.
Step 1: Create and Configure a Twitter App
Open the Developer Console and create or select an App. Enable OAuth 1.0a and set permission to read and write. Save the settings before generating these credentials:
API Key
API Key Secret
Access Token
Access Token Secret
If you change the permissions after creating the Access Token, authorize the App again and generate a new Token. Make sure the developer account has API access and enough credits to publish posts.
Step 2: Set Up the Python Project
Python 3.8 or later is required. Create a virtual environment inside the project folder:
python -m venv .venvActivate it on macOS or Linux:
source .venv/bin/activateFor Windows PowerShell, use:
.venv\Scripts\Activate.ps1Install the required packages after activating the environment:
python -m pip install xdk python-dotenvCreate an .env file and add your credentials:
TWITTER_API_KEY=your_api_key
TWITTER_API_SECRET=your_api_key_secret
TWITTER_ACCESS_TOKEN=your_access_token
TWITTER_ACCESS_TOKEN_SECRET=your_access_token_secret
Add .env to .gitignore so the credentials are not uploaded to a public repository.
Step 3: Create the Queue and Bot
Create queue.txt in the project folder and add one post per line:
Our first automated Twitter post.
A second update is ready to publish.
Create bot.py in the same folder:
import os
from pathlib import Path

from dotenv import load_dotenv
from xdk import Client
from xdk.oauth1_auth import OAuth1

load_dotenv()

queue_file = Path("queue.txt")
posts = [
    line.strip()
    for line in queue_file.read_text(encoding="utf-8").splitlines()
    if line.strip()
]

if not posts:
    print("No posts are waiting in the queue.")
    raise SystemExit(0)

auth = OAuth1(
    api_key=os.environ["TWITTER_API_KEY"],
    api_secret=os.environ["TWITTER_API_SECRET"],
    access_token=os.environ["TWITTER_ACCESS_TOKEN"],
    access_token_secret=os.environ["TWITTER_ACCESS_TOKEN_SECRET"],
)

client = Client(auth=auth)
response = client.posts.create(text=posts[0])

remaining_posts = posts[1:]
queue_file.write_text(
    "\n".join(remaining_posts) + ("\n" if remaining_posts else ""),
    encoding="utf-8",
)

print(f"Post published successfully: {response.data.id}")
The script publishes the first line in queue.txt. It removes that line only after the API request succeeds, leaving the remaining content for later runs.
Step 4: Run and Schedule the Bot
Test the bot from the project folder:
python bot.pyConfirm that the post appears on the correct Twitter account and that the terminal displays its Post ID.
To publish the next queued post automatically every hour on Linux or macOS, add this cron job:
0 * * * * cd /absolute/path/to/bot && /absolute/path/to/bot/.venv/bin/python bot.py >> bot.log 2>&1Replace both paths with the actual project location. On Windows, create the same schedule as Task Scheduler. Add new lines to queue.txt whenever more posts are ready, and check bot.log if a scheduled run fails.
What a Proxy Can Do for Your Twitter Bot
A proxy becomes useful when the bot also gets information from other services. An ISP Proxy provides a fixed IP for connecting to APIs that accept only approved addresses. A Residential Proxy supplies residential IPs for public web data collection. The bot can turn the collected data into alerts or updates and publish them through the official Twitter API. A bot that only publishes prepared content usually does not need a proxy.
💡Note: A proxy does not increase X API credits or rate limits, replace OAuth, make prohibited automation compliant, or guarantee that a Twitter account will avoid restrictions.
For the above network requirements, IPcook provides both fixed ISP connections and location-flexible Residential connections. ISP Proxies are the stronger default for continuous Bot deployments because the connection can keep the same IP over time. Residential Proxies are a secondary option when the Bot needs public data from different locations.
IPcook ISP Proxies: Static, ISP-assigned IPs maintain a consistent connection over time. Backed by 99.9% uptime and unlimited traffic, they can remain active without frequent IP changes or data usage caps. Support for HTTP and SOCKS5 protocols ensures compatibility with a wide range of clients and automation tools.
IPcook Residential Proxies: Access 55M+ residential IPs across 185+ countries, with country and city-level selection. A one-line API call simplifies proxy allocation, while average global response times under 0.5 seconds and latency as low as 50 ms in major regions support fast connections. HTTP and SOCKS5 protocols are also supported.
FAQs About Creating a Twitter Bot
Is the X API free for Twitter bots?
No. The X API currently uses pay-per-usage pricing. You purchase credits in the Developer Console, and each request deducts credits based on the endpoint used. Prices may change, so check the Developer Console when publishing this guide and before setting your Bot's budget.
Can I still use Tweepy?
Yes. Tweepy is a third-party Python library that supports API v1.1 through API and API v2 through Client. Some older tutorials use v1.1 methods that may not work with current access. Check your Tweepy version and confirm API v2 support before using an example.
Can a Twitter bot reply automatically?
Yes, but automatic replies require user authentication and write permission. Limit them to clear, relevant triggers such as mentions or direct interactions. Avoid repetitive, unsolicited, or mass replies. The Bot must also stay within current API limits and Twitter's automation rules.
Final Verdict
Learning how to create a Twitter bot starts with choosing the right method. A no-code tool suits simple automated posts, while Python and the official API provide more control over content, scheduling, and error handling. Whichever method you choose, test each workflow and follow Twitter's automation rules.
Some custom bots also gather information from outside Twitter. When that requires fixed-IP access or public data collection, IPcook provides ISP and Residential Proxies to support those external requests.