How to Get and Set Up a Static IP Address: Complete Guide

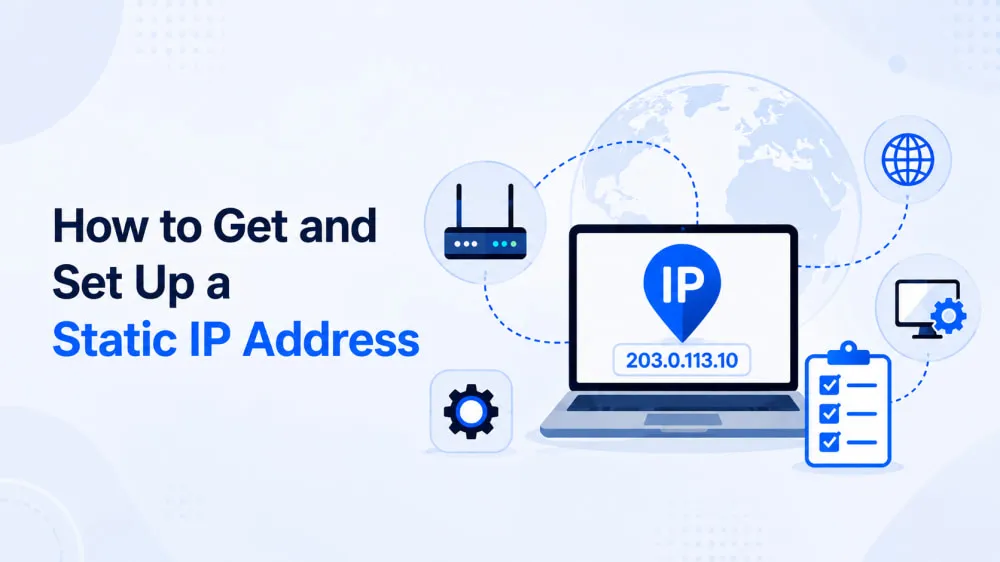
A static IP address stays the same, even when a device or network reconnects. It can be useful when you need a consistent address for your network or a service, but not everyone needs one. Not sure whether you need a static IP or which type to choose? This guide will help you decide, then provide detailed setup instructions for the option that fits your needs. If you already know which type you need, skip ahead to the relevant section.
What Is a Static IP Address?
An IP address identifies a device or network and helps data reach the right destination. Most home internet connections use a dynamic IP address, which may change over time. Those changes rarely affect everyday activities such as browsing, streaming, or using online apps. By contrast, a static IP address remains assigned to the same device or network until someone changes the assignment.
A static IP can be used on the public internet or inside a private network. A public static IP gives your network a consistent address on the internet. It can simplify remote access, hosting, and IP allowlisting, and usually comes from your ISP (Internet Service Provider) for an additional fee. A private static IP keeps a device at the same address within your local network. You can assign one to a printer, NAS, or media server through your router or directly on the device.
💡More to Explore:
Dynamic vs Static IP: What's the Difference & Which to Choose?
When Should You Use a Static IP Address?
A changing IP is usually fine until another device or service needs to find the same address again. The examples below show when keeping that address consistent is helpful.
Who | When it helps | IP type |
Personal | Keeping a printer, NAS, or camera easy to find at home | Private |
Personal | Hosting a service or reaching a home network remotely | Public |
Business | Running servers, VPN gateways, or IP allowlists | Public |
Business | Managing internal servers and network equipment | Private |
You usually do not need a static IP for browsing, streaming, gaming, or everyday app use. It does not automatically improve speed or security, so there's little reason to configure one unless you need a consistent address.
How to Set Up a Private Static IP
If your goal is to keep a device such as a printer, NAS, security camera, or local server easy to reach within your network, start by setting up a private static IP. You can reserve the address through your router or enter it manually on the device, without involving your ISP.
Method 1: Use a DHCP Reservation
A DHCP reservation tells the router to give the same private IP to a device whenever it connects. The device can remain set to obtain an address automatically, which makes this method easier to manage than entering network information on every device.
Open your router's web interface. Enter your router's IP address in your browser. Common addresses include
192.168.1.1and192.168.0.1. Check your router's documentation if you do not know the correct address.Sign in to your router. Enter your administrator username and password, then find the "DHCP" or "LAN settings".
Find your device. Open the "DHCP Client List" or "Connected Devices" section and note the device's MAC address and current IP address.
Set up the reservation. Open Address Reservation, DHCP Reservation, or a similar option. Enter the device's MAC address and the private IP address you want to reserve, then save the settings.
Reconnect the device. Disconnect and reconnect it to the network, or renew its DHCP lease. The device should then receive the reserved IP address.
💡Note: Make sure no other device is using the same IP address.
If the reservation does not work, check whether your device's Wi-Fi MAC address changes automatically. This feature may be called a private or randomized MAC address on some devices. The change can prevent the router from recognizing the reservation.
Method 2: Assign the IP Manually
Manual assignment saves the private IP directly in the device's network settings. Use this method if your router does not support DHCP reservations or you need to control the address from the device itself.
On Windows:
Open Settings > Network & internet. Then open Properties and note the IPv4 address, subnet prefix length, default gateway, and DNS servers.
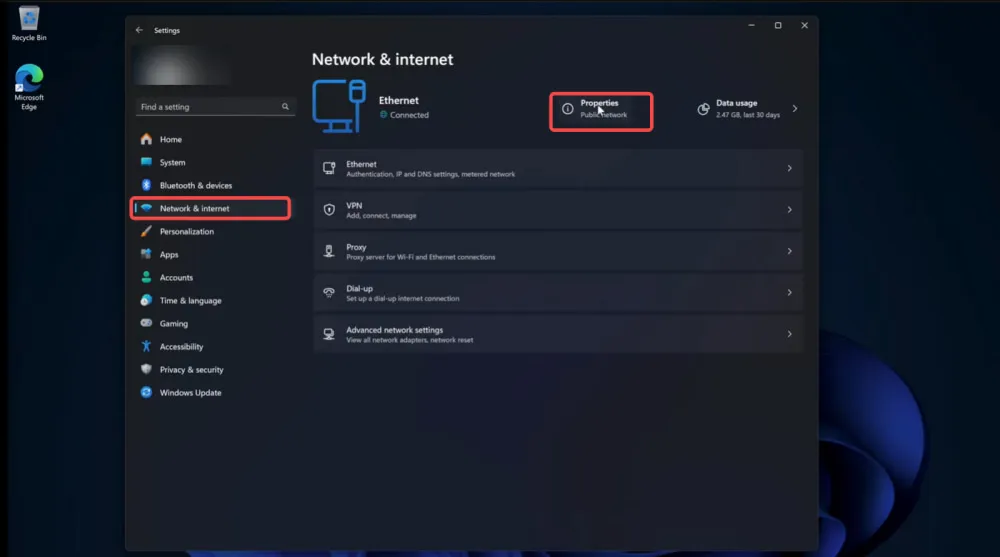
Enter the default gateway address in a browser and sign in to the router. Open LAN, DHCP, or Local Network settings to find the DHCP range. Menu names vary by router.
Choose an unused IP in the same subnet but outside the DHCP range. For example, if DHCP assigns
192.168.1.100through192.168.1.200, an available address below192.168.1.100may be suitable.Return to the Windows connection settings. Find the IP assignment, click Edit, select Manual, and turn on IPv4.
Enter the chosen IP address and the subnet prefix, default gateway, and DNS servers recorded earlier. Then click Save, then open a website to confirm that the connection works.
On macOS:
Open Apple menu > System Settings > Network. Select the active connection, click Details, and open TCP/IP. Note the current IP address, subnet mask, and router address. Check DNS for the current DNS servers.
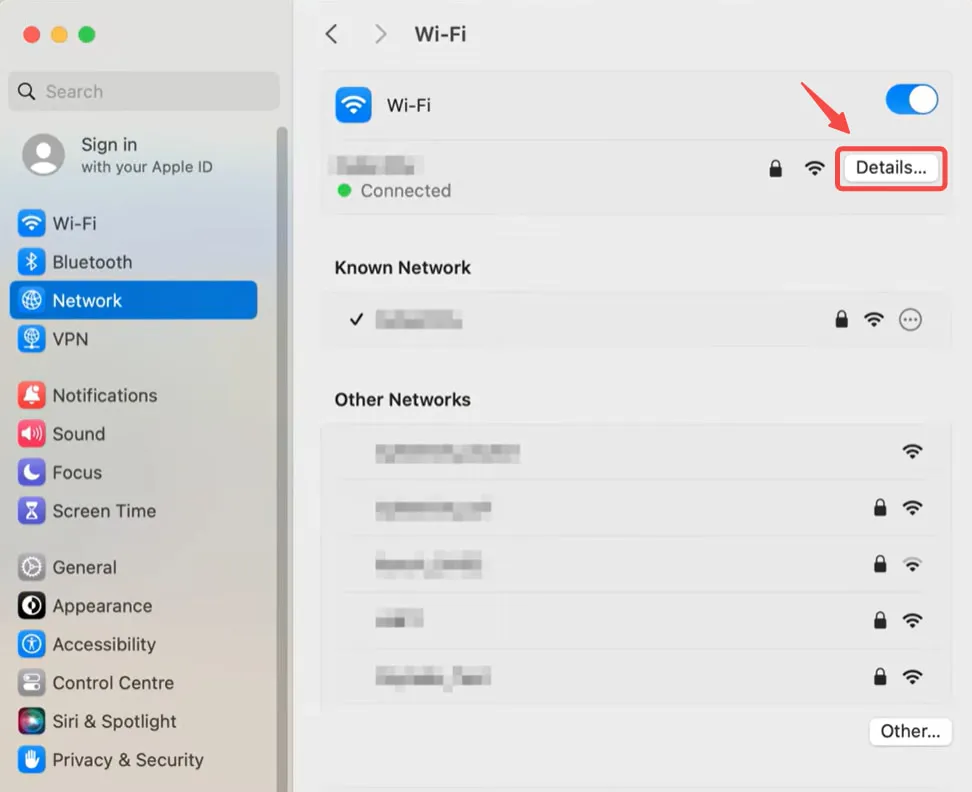
Enter the router address in a browser and sign in. Find LAN, DHCP, or Local Network settings, then note the DHCP range.
Choose an unused IP in the same subnet that falls outside the DHCP range.
Return to Network > Details > TCP/IP and set Configure IPv4 to Manually. Then enter the chosen IP address, subnet mask, and router address.
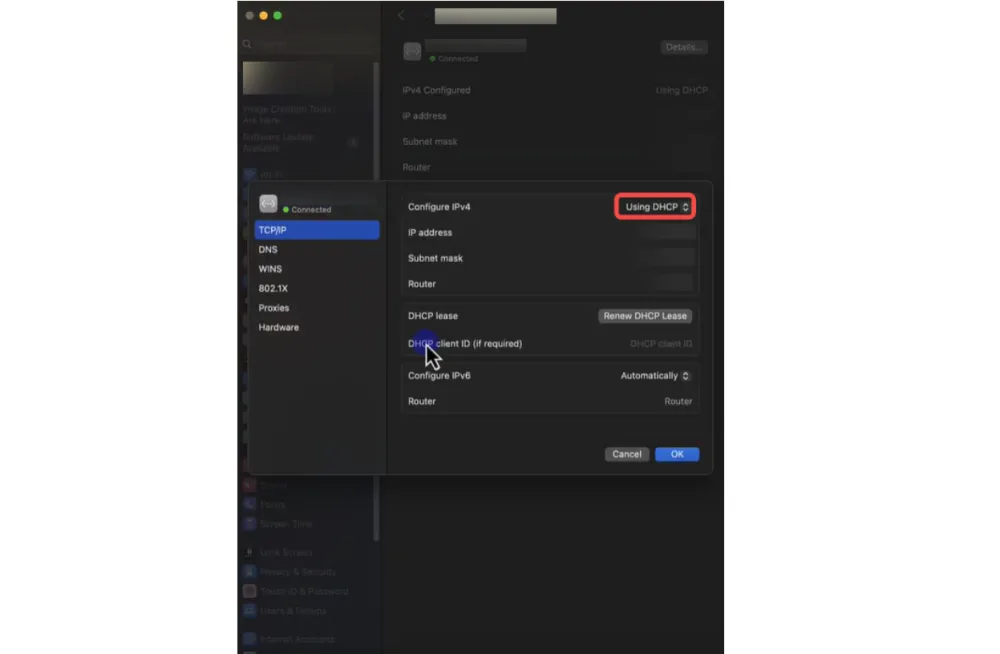
Open DNS and enter the DNS servers recorded earlier. Then click OK, then open a website to confirm that the connection works.
How to Get and Set Up a Public Static IP
A private static IP keeps a device at the same address inside your local network, but that address cannot be reached directly from the internet. If you need people, apps, or services outside your network to connect to you through a consistent address, you need a public static IP.
The following methods explain how to get one from your ISP or reserve one for a cloud-hosted resource.
Method 1: Get One From Your ISP
Use this method when your home or office internet connection needs a fixed public IP. The ISP assigns the address to your connection, rather than to a cloud-hosted server.
Find your current public IP. Search "what is my IP" in a browser and write down the address shown.
Check your router's WAN IP. Enter the router's address in a browser and sign in. You can usually find the login address and administrator details on the router label or in its manual.
Ask your ISP about CGNAT and static IP service. If the WAN IP differs from the public IP, tell the ISP because the connection may use CGNAT or another layer of routing. Confirm whether a public static IP is available, what it costs, and whether your current plan supports it.
Request the static IP. The ISP may activate it automatically or provide an IP address, subnet mask, gateway, and DNS servers for manual setup. Follow the method specified by the ISP.
Apply the settings. For automatic activation, restart the modem and router. For manual setup, return to the router's Internet or WAN page, select Static IP, enter the values exactly as provided, and save the changes.
Verify the result. Check your public IP again and make sure the internet works. Reconnect or restart the router later and confirm that the same address remains assigned.
Method 2: Reserve One From a Cloud Provider
This method works when the website, app, or server that needs a fixed public IP is hosted in the cloud. The address is assigned to the cloud resource.
Open your cloud project. Sign in to the cloud provider's console and select the project or account containing your server.
Find the IP address page. Use the console search bar to look for Public IP, External IP, Elastic IP, or Reserved IP.
Create a reserved address. Select Create, Reserve, or Allocate, then choose the same region as your server.
Connect it to the server. Select the server or network interface that needs the address and confirm the assignment.
Update the configuration. Point any relevant DNS records and IP allowlists to the new address. Review the firewall rules if the service cannot be reached.
Verify the address. Open the server's details page and confirm that the reserved public IP appears as its external address.
💡Tips: Menu names vary by provider. Searching the cloud console for "public IP" or "external IP" is usually the quickest way to find the correct page.
What If Your ISP Doesn't Offer a Static IP?
If your ISP does not offer a static IP, the right alternative depends on what you need: reliable access to your home network, a fixed address for a cloud service, or a consistent outbound IP. These options solve different problems and are not interchangeable.
Use DDNS for Remote Access
DDNS keeps a hostname connected to your changing public IP. It gives you a consistent way to find a NAS, camera, or home server without checking the IP each time it changes. But it does not create a static IP. Remote access may still require port forwarding and firewall configuration, and DDNS alone usually cannot bypass CGNAT.
Use a Cloud Server With a Static IP
A cloud server provides a fixed public endpoint for a hosted website, application, or development project. Reserve a static public IP through the cloud platform and assign it to the appropriate resource. However, the address belongs to the cloud resource, not your home router. It does not make your home internet connection static.
Use a Dedicated VPN IP
A dedicated VPN IP gives you a fixed outbound address through the VPN provider. Websites and online services see this address instead of your ISP-assigned IP, while the encrypted VPN connection keeps your original public IP hidden. However, it does not assign a static WAN IP to your home router or make your local network directly accessible from the internet.
Use an ISP Proxy for Task-Specific Access
An ISP proxy is another option when a specific browser or application needs a consistent outbound IP. The browser or application connects to websites through proxy instead of using your regular internet connection. For example, social media teams can pair each browser profile with a static ISP proxy to manage authorized brand accounts across different regions. A proxy provider such as IPcook can supply the fixed proxy IP and connection details needed for this setup while maintaining a stable connection.
IPcook ISP Proxies provide fixed exit IPs, allowing selected traffic to keep the same outbound address. With 99% uptime and low latency, they support stable, fast connections for ongoing tasks. Unlimited traffic removes data limits, while HTTP and SOCKS5 support allows the proxies to work with compatible browsers, clients, and automation tools.
IPcook provides a proxy setup user guide to help you find your proxy host, port, and authentication details. You can then add these details to the application that should use the fixed exit IP.
How to Change a Static IP Address
A static IP stays the same during normal reconnections, but it can still be replaced. The correct method depends on whether the address is public or private.
For a public static IP:
Ask your ISP to replace an ISP-assigned WAN IP. Do not enter an unassigned public address in your router.
Reserve a new cloud IP, attach it to the resource, and update the relevant DNS and firewall settings.
For a static proxy, obtain another IP from the provider and replace the connection details in your application.
For a private static IP:
Change the device's reserved address in the router's DHCP settings, then reconnect the device.
Replace a manually assigned address in the device's TCP/IP settings after confirming that the new address is available and belongs to the correct subnet.
Finally, update anything that still uses the old IP, such as DNS records, allowlists, port-forwarding rules, and saved connections.
Conclusion
Setting up a static IP address starts with choosing the right type. Use a private static IP to keep a device easy to find within your local network. Choose an ISP-assigned public IP when your home or office connection needs a consistent internet address, or reserve one through a cloud provider for a cloud-hosted resource.
If certain browser or application traffic needs a fixed outbound IP, an ISP proxy may be a better fit. IPcook ISP Proxies provide fixed exit IPs for that purpose without changing your router's public IP.